|
P r o d u c t s |
|
Software |
|
Continuous changes are
made to the software to meet the customer’s demands. The following describes the FC Software that
comes with the FC Kiln Control System. Main Top Menu STARTING THE PROGRAM 1.
Click on
the Start Menu in the lower left hand corner of the screen. 2.
Use the
mouse to point to Programs. 3.
Then click
the left hand mouse button once and the program should start. MAIN MENU BAR The main Menu bar is at the top of the
screen. The Menu items are File,
Current Values Kiln Control, Alarm Display, Auxiliary Functions, Kiln
History, System Set-up, & Help.
See section on Screen Displays for details.
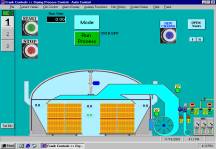
Figure 1 Main Menu Bar KILN BUTTONS Down the left side of the screen are the Kiln #
buttons. Selecting a button will show
specific information for that Kiln based on the main Menu selection. The currently selected Kiln # will show
its Kiln # in large Bold letters. The
Kiln button colours indicate the current status of the Kiln as follows. Grey -currently
selected kiln, or Kiln is not running. Green -Kiln is running Green-Flashing
-Kiln is Starting Red -Kiln has
stopped Red-Flashing -Kiln is stopped, or Kiln is
in an Alarm condition. Orange -Kiln is in Low Fire
mode. Blue -Drying is done There are two lights near the top left
corner. They show a T & R within
a circle. These should flash
alternately bright green, indicating that the PC program is talking to the
Frank Control Computer System.
Figure 2 Kiln Selection Buttons (Normal Operation) ACCESS CONTROL Your supervisor will assign a Password for each person
to have access to the program. Each
person is given a selection of functions that they can access. The needs of the Kiln Operator may vary
from the Maintenance personnel and Supervisors. LOGGING ON
1. Select File à Log On
from the Main Menu. 2.
Type your
assigned Password in the box provided.
(Password is not case sensitive) 3.
Press
ENTER on the keyboard or click the Log On button. LOGGING OFF 1.
Select
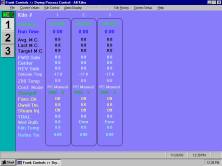
File à Log Off from the Main Menu. Note: If no operator activity for 15 minutes the program will automatically log off Current Value Screens ALL KILNS This screen shows a summary of each Kiln in a
column. It is updated every two
minutes. The summary consists of
nineteen properties for each Kiln. Kiln
Properties Process
– The current Process that
is running Run
Time – The amount of time
the Kiln has been running Avg.
M.C. – The average
moisture content of the lumber in % Last
M.C. – The last moisture
content of the lumber calculated in % Target
M.C. – The moisture content
that the Kiln will shut down at % FWD
Side – The average
temperature on the Forward Side in ° F Center – The average temperature in the Center
in ° F REV
Side – The average
temperature on the Reverse Side ° F Outside
Temperature – Outside
Temperature in ° F Z80
Temp. – Temperature Sensor
on the Digital Temperature Card in ° F Cont.
Mode – Mode that the Kiln
is running (See Kiln Control section
for details) Charge
# - The charge # for the
charge in the Kiln Fans
Dir. – The direction the
fans are turning Dwell
Tm. – The time left before
the Kiln fans start Steam
Injection - If the Kiln
has Steam Injection shows if it is On or Off TDAL. – High Side temperature – Low Side Temperature in ° F Wet
Bulb – The Wet Bulb
temperature in ° F Kiln
Temp. – The Highest Side
temperature in ° F Re-fire
Time – The amount of time
the Kiln has been running in Refire Mode.
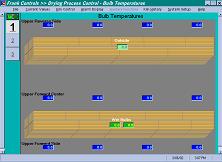
Figure 3 All Kilns Screen BULB TEMPERATURES This screen displays the temperature in ° F of
every bulb in your system for the Kiln that is selected. Temperatures of 265 or larger indicate an
error code for that bulb. See
Hardware manual for troubleshooting bulbs.
The bulbs are numbered with the first bulb being in the top left hand
corner. This screen is updated every
two seconds.
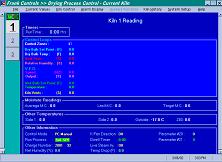
Figure 4 Bulb Temperatures Screen CURRENT KILN This screen displays current values for the
current Kiln that is selected. The
screen is divided into five sections; Timers, Control Loops, Moisture
Readings, Other Temperatures, and Other Information. This screen is updated every two seconds. Timers Run Time – Current running (elapsed) time from when the Kiln was started Refire Time – The amount of time left. Only displayed if running Refire Mode Control
Loops Control
Zones – The zone number up
to a maximum of 12 zones Dry
Bulb Set Point – The Dry
Bulb temperature in ° F should never exceed this limit. This limit can be modified in the Process
Parameters. Dry
Bulb Temp – The Highest
Side temperature in ° F Heat
Flow – The heat flowing
into the Kiln measured in % Relative
Humidity – The % Relative
Humidity in the Kiln VFD
Speed – Feedback speed in
Hz from the VFD VFD
Output – Output % of VFD
motors maximum current Wet
Bulb Set Point – The Wet
Bulb temperature in ° F should never exceed this limit. This limit can be modified in the Process
Parameters. Temperature – The lowest Wet Bulb temperature in °
F Kiln
Vents – The vent position
in % Moisture
Readings The Moisture content of the lumber does not start
calculating until the Kiln approaches the desired operating temperature. Typically the desired operating
temperature is 180 ° F. When the
average MC achieves the Target MC, the Kiln drying is done. The Kiln Operator can fine tune this
calculation for each Process based on the results of the moisture check. (See System Set-up for details on tuning
this calculation) Average
M.C. – The average
moisture content of the lumber in % Last
M.C. – The last moisture
content of the lumber calculated in % Target
M.C. – The moisture content
of the lumber in % when the Kiln will shut down Other
Temperatures Side 1 – The average temperature in ° F on
side 1 Side 2 – The average temperature in ° F on
side 2 Outside
– The outside temperature
in ° F double click on it for ° C Z80 – The temperature sensor on the Digital
Temperature Card in ° F Other
Information Control
Mode – The Mode the Kiln
is running (See Kiln Control for Mode
Types) Run
Process – The process that
the Frank Control Computer System is using Charge
Number – The charge # for
the lumber in the Kiln Relative
Humidity – The % Relative
Humidity in the Kiln K-Fan
Direction – The current
direction the Kiln fans are turning Dwell
Timer – The time left for
the Kiln fans to start up Live
Steam Injection – If the
Kiln has Steam Injection shows if it is On or Off Temp
Drop – Highest Side
Temperature – Lowest Side Temperature in ° F Parameter
#20 – (See section System
Set-up Process Parameter 20 of this manual) Parameter
#21 – (See section System Set-up
Process Parameter 21 of this manual)
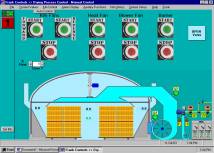
Figure 5 Current Kiln Screen Operator Control MANUAL CONTROL If PC Manual Control has been selected the
operator can individually control things.
The desktop PC will only enter this Mode if the Frank Control Computer
System confirms the Kiln is not running.
This Mode is useful for maintenance to check for starting contractors,
running in new bearings, fan blades etc. and when access to the PLC program
is unavailable. The Manual screen
shows a Start / Stop button for each motor & the Burner. The burner can only be started onto Low
fire. The Heat output can be
increased 5% at a time with the heat control.
Figure 6 PC Manual Control Screen AUTO CONTROL The user is in Auto Control in all Modes except PC Manual. The most used Mode in Auto Control is Run Process. Starting a Kiln with a New Charge 1.
Click the
Mode button and select Run Process 2.
Click the
Run Process button 3.
Select
the Process you want to run and click Send
to FC 4.
Click the
New Charge button 5.
Click the
Start button
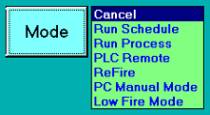
Figure 7 Auto Control screen while running a Process MODE When clicking on the Mode button a list of six
different Modes will pop up that the user can choose from to run the
Kiln.
Figure 8 Mode Button Run Schedule (Mode 1) Future use, to allow time based, non-process
control Run Process (Mode 2) Dynamic Process Control meaning the Kiln dries
depending on what the lumber is doing.
This is the Mode for Normal Operation of the Kiln. Once this Mode has been selected a button
labelled Run Process and New Charge will
appear. When the Run Process button
stops flashing and is solid green the Frank Control Computer Systems Mode has
been change successfully. (See Auto
Control in this section for instructions on starting a Kiln with a New
Charge) PLC Remote (Mode 3) Allows operation of Kiln from each Kilns MCC and
manual controller. Cannot be
activated unless the Kiln is not running.
Once the Manual/Auto switch at the Kiln is in Manual Mode, you cannot
switch to any other mode at the PC until the switch at the Kiln is back in
Auto. Re-fire (Mode 4) This Mode is used to further dry lumber at the
completion of a drying charge. If the
Kiln Operator’s Moisture Content check comes back to wet then the charge will
require Re-firing for a set amount of time.
DO NOT PRESS NEW CHARGE BUTTON instead press the Mode button &
select Re-fire. Time values can be
entered in the Re-fire frame that appears.
The amount of time required in each direction will depend on the MC
readings on each side of the Kiln.
Typically a rate of 1.5% MC per hour can be used to estimate the time
required. To start the Kiln again
simply click the Start button. The
Kiln will first start in the Reverse direction, cycle thru the time entered
then switch to Forward direction. The
Current Kiln and Auto Control screens will show the time as it counts down.
Figure 9 Re-fire Frame PC
Manual Mode (Mode 5) Selecting
this will allow the user to view the Manual Control screen. Low
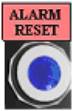
Fire Mode (Mode 6) Keep the burner on low fire to keep the Kiln warm. ALARM RESET An Alarm reset button will show up next to the
Stop button for conditions that require the Operator’s attention. The Kiln button will flash red. On a Gas Kiln the Burner may be on low
fire or turned off depending on the Alarm.
From the main Menu select the Alarm Log. This will display the alarm message. Once the Alarm condition is resolved press the Alarm Reset button
to reset it. The Kiln will restart if
required. If the Alarm button
returns, then another Alarm has occurred or the original Alarm has not been
resolved. Recheck the Alarm Log. Note: After looking at the Alarm Log, the Alarm Log is cleared. It only shows the most current Alarms. A permanent record can be viewed in Kiln History, View, and Alarm Log.
Figure 10 Alarm Reset Button NEW CHARGE This button resets the Run Time counter and lets
the Frank Control Computer System know to start a New Charge. A new Graph is also started. This button is not available while a
Charge is running, unless the Kiln is stopped after 5 hours. The New Charge label above the button will
be visible for a while to let you know a new charge has just been started
Figure 11 New Charge Button START In Auto Control clicking on this button will start
the Kiln. The sequence which things
start up will depend on some of the Kiln Parameters.
Figure 12 Start Button STOP When the Kiln is running pressing Stop once will
shut down everything except the blower.
Hit the Stop button a second time and the blower will shut down.
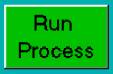
Figure 13 Stop Button RUN
PROCESS Clicking on this button will open a frame allowing
the user to select a process and send it to the Frank Control Computer
System. (See the section on System
Set-up to make your own Process)
Figure 14 Run Process Button Reporting and Logging Kiln History allows the user to view the graphs of
any current charge or previous charges.
During each charge the desktop PC records information from the Frank
Control Computer System every 2 minutes.
The current charge’s graph is shown on the screen. To select which Kiln’s graph to view use
the small Kiln buttons at the bottom of the screen. The Kiln History has its own Menu items separate from the rest
of the program. The remainder of this
section will describe the Kiln History Menu Items.
Figure 16 Kiln History FILE This menu’s main functions are to view saved data
from previous charges and change the data that is displayed on the graph. Load
Main Available charges for each are shown in a
list. The list shows the charge’s
date, and charge #. The user can
select a different Kiln by using the combo box above the buttons. To open a specific charge and view its
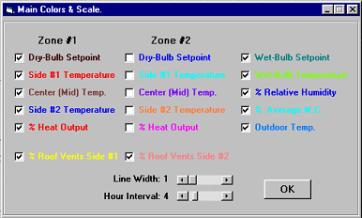
data, select the Charge à click the Open button. Main
Color and Scale / Overlay Color and Scale This Menu item allows the user to change the color
of specific data and choose which data will be displayed on the graph. To change the colors of for example
Dry-Bulb Set Point simply double-click on it. To allow it to display on the graph check off the box beside
it. The Hour Interval control at the
bottom of this Menu item can be changed to adjust the size of the graph
beginning displayed. The Line Width
control can be changed to adjust the thickness of the lines displayed.
Figure 15 Main Colour and Scale Load
Overlay This Menu Item works the same as Load Main. The difference is a charge opened using
this Menu item will be overlaid onto the existing graph for comparison. A separate scroll bar is shown for control
of the overlay’s position. Print Sends the graph on the screen to the printer. VIEW This Menu Item allows the user to view data that
has been saved to the hard drive. Reports At the completion of a Charge, a Report is
collected from the Frank Control Computer System. Selecting this Menu item will display a Report on the data
saved for the particular graph that the user is looking at on the
display. The Report A displays
information about a specific charge.
Clicking print on the Menu at the top will print it. Report A This Report shows the most detail of what happened
in the Kiln during the elapse of the charge.
It shows the user times of when certain things happened, temperatures,
information about heat-up, refire, kiln fan reversals, tally, and the process
parameters used during the charge.
After the Kiln Operator checks the Moisture Content of the lumber
he/she can enter M.C. readings to the report. There is also a Memo button so that the user can add additional
notes to the report about the charge. Report B This Report shows the Kiln temperatures during the
elapse of the charge. The amount of
time it took to reach those temperatures, the fan direction, and if
applicable the fan speed. Change
Log Changes made to the Parameters are recorded
here. The date & time of the
change will be saved so it can be used to review the changes versus the quality
of drying to determine which changes responded well. Activity
Log Program activity is recorded here. When a Kiln Operator does something like
logging on or starting a new charge it is recorded here. Alarm
Log The date & time of when alarms occur are
recorded here. |
|
|